まさにぃの折り紙コラム

折紙師範まさにぃのブログ。

カワ難おりがみ「王子のネコ」クラッポマーブルで神秘的な仕上がりに!/ "Arisawa Cat" with mysterious Crapo Marble

アトリエまさにぃへ、ようこそ。

f:id:masanii_origami:20210617204340j:image

Welcome to Atelier masanii.


先日は、有澤悠河さんの「ネコ」について、仕込み解説をがっつり書かせていただきました。
(2021/06/04)

masanii-origami.hatenablog.com

In my previous article, I've explained thoroughly about preparation of creases of "Cat" designed by Yuga Arisawa, the Origami Prince.


今日の素材は、「クラッポマーブル」

光に透かすと青緑色が浮かび上がる、不思議な特徴をもった紙です。
はじめは真っ白なのに、折っていくと影の部分が徐々に青みを帯びていき…
「王子のネコ」にぴったりの、高貴な雰囲気に仕上がりました!

f:id:masanii_origami:20210617202818j:imagef:id:masanii_origami:20210617202828j:imagef:id:masanii_origami:20210617125940j:image

Today's material is "Crapo Marble", the white paper which has characteristic greenish blue shadow.
At the beginning it seems to be an ordinary white paper, as it is made, it gradually becomes bluish...
Finally it got noble  atmosphere that is suitable for "Prince cat"!


暗闇でのライトアップ、朝日に照らされた姿、蛍光灯の下での輝き。
皆さんは、どの演出がお好みでしょうか?

f:id:masanii_origami:20210617202907j:imagef:id:masanii_origami:20210617202856j:imagef:id:masanii_origami:20210617202917j:imagef:id:masanii_origami:20210617203128j:image

Light up in the dark, with morning sun, under the room light, which is your favorite!?


☘️☘️☘️


さて、幻想的な潜在色が魅力のクラッポマーブルですが、適度な厚みとハリがあり、そこそこ丈夫なところも気に入っています。

Crapo Marble is so attractive for its mystical potential color, but it also has moderate thickness and tension, and durability.


今回のサイズは、A3を正方形にカットした29.7cm×29.7cm。
クラッポマーブルは通常A4しか売っていないのですが、佐藤ローズの創作者・佐藤直幹さんが特注したものを譲っていただきました。 

Today I used a 29.7cm×29.7cm square paper that was cut from A3 size.
Though there's only A4 size on the market, Mr. Naomiki Sato, the creator of Sato Rose, gave me A3 size that he personally ordered from the manufacturer.


A4のクラッポマーブルは、Amazonでも購入できます。
結構小さくなりますが、練習すれば無理な大きさではありません。
本家・有澤さんが、5cmで折れるくらいですから!

とはいえ私も未挑戦なので、作った際には改めてレビューさせていただきますね。

You can purchase A4 size Crapo Marble on Amazon.
It'll require detailed work, but you may be able to make with some practice.
Mr. Arisawa, the designer can make with 5cm paper!

Although I haven't try with this size yet, so I'd like to report when I do.


しかし、残念なことに、メーカーでの生産はすでに終了しており、在庫限りの販売だそうです。
まだ普通に買えるようなので、気になった方はポチっておきましょう!

However, unfortunately it's no longer in production.
It seems to be still in stock, you should get if you interested!!


☘️☘️☘️


ところで。
今回の制作にあたっては、仕込みのラインを確かめるために、自分で書いた記事を参考にしました。

By the way
In today's work, I referred to my own article to confirm the creases.


自画自賛で恐縮ですが…

めっちゃ分かりやすい!!

折り線がよく見えるよう光の当たり方を考え、一枚一枚コントラストを調整した甲斐がありました。
テキストと記事を見比べながら作れば、大抵のミスは防げるでしょう。
苦戦している方は、ぜひ一度お読みいただき、完成への足かがりにしてみてください。
(2021/06/04)

masanii-origami.hatenablog.com

Excuse me for self-praise...

It's EXCELLENT!!!!!

So easy to understand!

I was worth the effort to change the direction of light and adjust the contrast of all photos.
You can prevent most mistakes if you proceed while comparing diagram and my article.
If you're struggling with this model, read it!


それでは。
アトリエまさにぃで、またお会いしましょう。

See you again in Atelier masanii:)


おりがみ王子・有澤悠河さんの「ネコ」。前半の折り筋を写真付きで解説!/"Cat" designed by Yuga Arisawa, the Origami prince

アトリエまさにぃへ、ようこそ。
Welcome to Atelier masanii.

f:id:masanii_origami:20210603234031j:image


今日の作品は…
ふっくらかわいい、ネコちゃんです!!

みんな大好き「おりがみ王子」こと、有澤悠河(ありさわ ゆうが)さんの代表作。
彼のファンブックとしても名高い、通称「カワ難おりがみ」の最終作品です。
(実際、眺めてるだけの人も結構いるのでは?)

Today's model is a plump & cute Cat!

A masterpiece of Yuga Arisawa, the Origami Prince.
It's the final work in his masterpiece "Kawanan ORIGAMI", also famous as his fanbook.
(Many fans may just browse and don't play.)


面を広く使った、ふんわり風船のようなデザイン。
シンプルに見える構造の中には、たくさんの工夫が詰まっているのでしょう。
細部を削ぎ落とし、絶妙なバランスで抽象化されたデザインには、暖かく素朴で、本来の「折り紙らしさ」がほんのり残ります。
そんな雰囲気を残したいと思って、素材はタント35cmを選びました。

I love the design which takes wide surface and balloon-like shape.
It must be a lot of ingenuity in the structure that looks simple.
This design which is simplified details and abstracted with exquisite adjustment, makes us warm & rustic, and has original Origami feeling.
The material that I chose is 35cm Tant paper to leave that atmosphere.


彼の公式サイトありさんの折り紙」では、作品に寄せた思いに触れるだけでなく、ミニサイズ(!)で折った極小ネコのジュエリーも買うことができます。
ぜひ一度、お読みください。

orisawa108.blog.fc2.com

Check his website above and feel the passion for this work.
You can also purchase his "Cat jewel" made of extremely minimal(!) paper.


☘️☘️☘️


さて。
今回のメインは、「仕込み解説」です。
先日、フォロワーさんから

「折り線をつける位置が分からない」

という相談があったので、これを機に私もチャレンジすることにしました。

Today's main topic is "Preparation of creases".
Recently I got a request from my friend "I can't understand how to make creases". That's why I decided to try.


なるほど。
確かに写真折り図は、光の加減で線が見づらい所がありますね。
せっかくの機会なので、気になったポイントを全部記事にしちゃいました。
写真と文章、テキストを見比べながら、じっくり進めてみてくださいね。
ペンで印をつけると、より分かりやすいかと思います。
では、いってみましょう!

Hmm, all diagram are made of photos, so sometimes it's hard to find creases because of the light.
Taking this opportunity, I have written an article about all points where I found them difficult.
Proceed carefully while comparing this article & photos, and textbook.
It'll be more easily if you mark with a pen.
Now, let's go!


☘️☘️☘️


■工程14
まずは、上の◯から。
上の紙は「工程11の上端」、下の紙は「工程12の下端」です。
この2点がピッタリ重なる点を探してみましょう。
次に、下の◯。
ここは、ちょうど紙のフチの中間地点、工程4の下端にあたります。
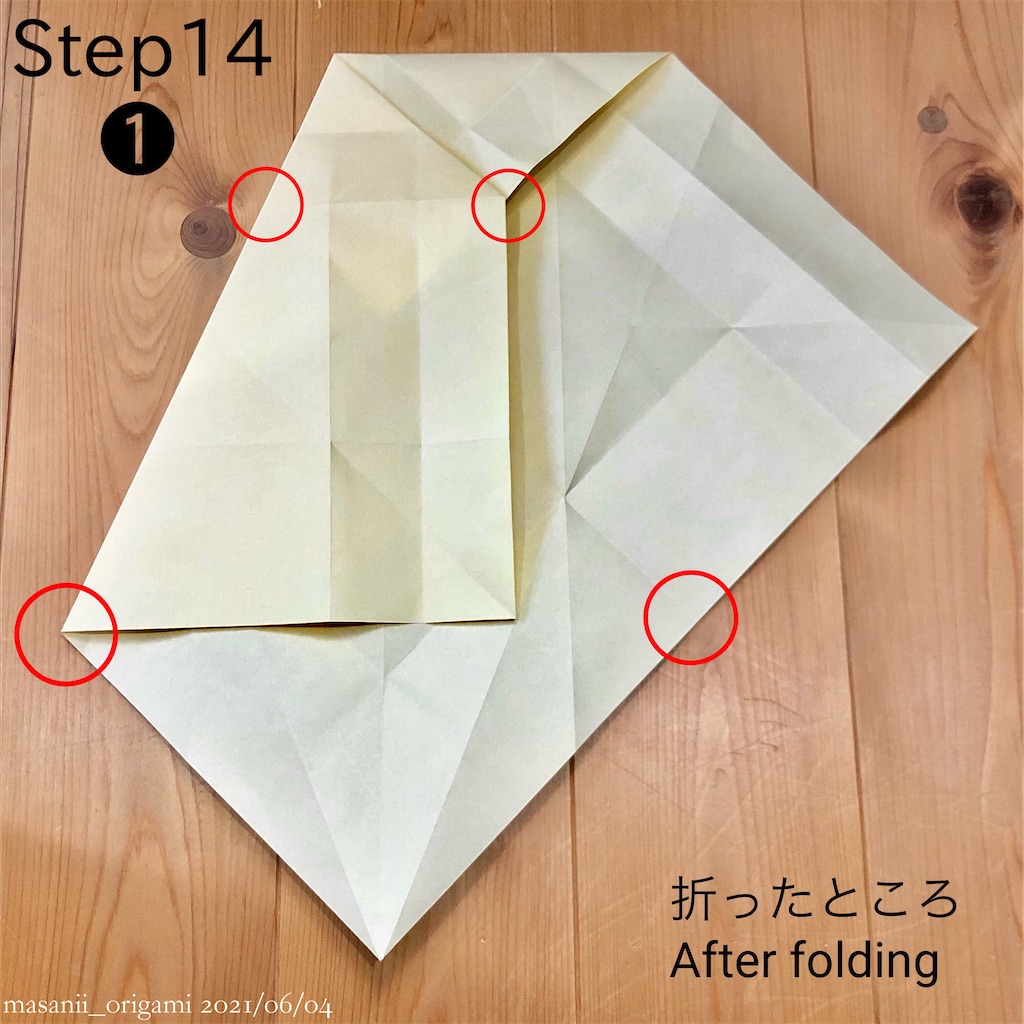
f:id:masanii_origami:20210604004916j:imagef:id:masanii_origami:20210604005002j:image

■Step14
First of all, ◯ on the upper side.
Paper on top is "Upper end of Step11's crease", paper on bottom is "Lower end of Step12's crease".
Find a point where two points overlap.
Next, ◯ on the lower side.
This corresponds to the middle of the paper edge, also "Lower end of Step4's crease".


■工程15
工程11の線に合わせて折ります。
上側はガイドがありませんが、左右で大きくズレなければ、神経質にならなくても大丈夫。
問題は、「どこまで折るか」です。
テキストでは工程12のラインで止まっていますが、実は工程4のラインまで折る必要があります。
(工程30のガイドになります)
これはテキストの誤りで、KADOKAWAさんのHPに正誤表が出ています。

https://www.kadokawa.co.jp/product/file/321904000132/2019929767.pdf
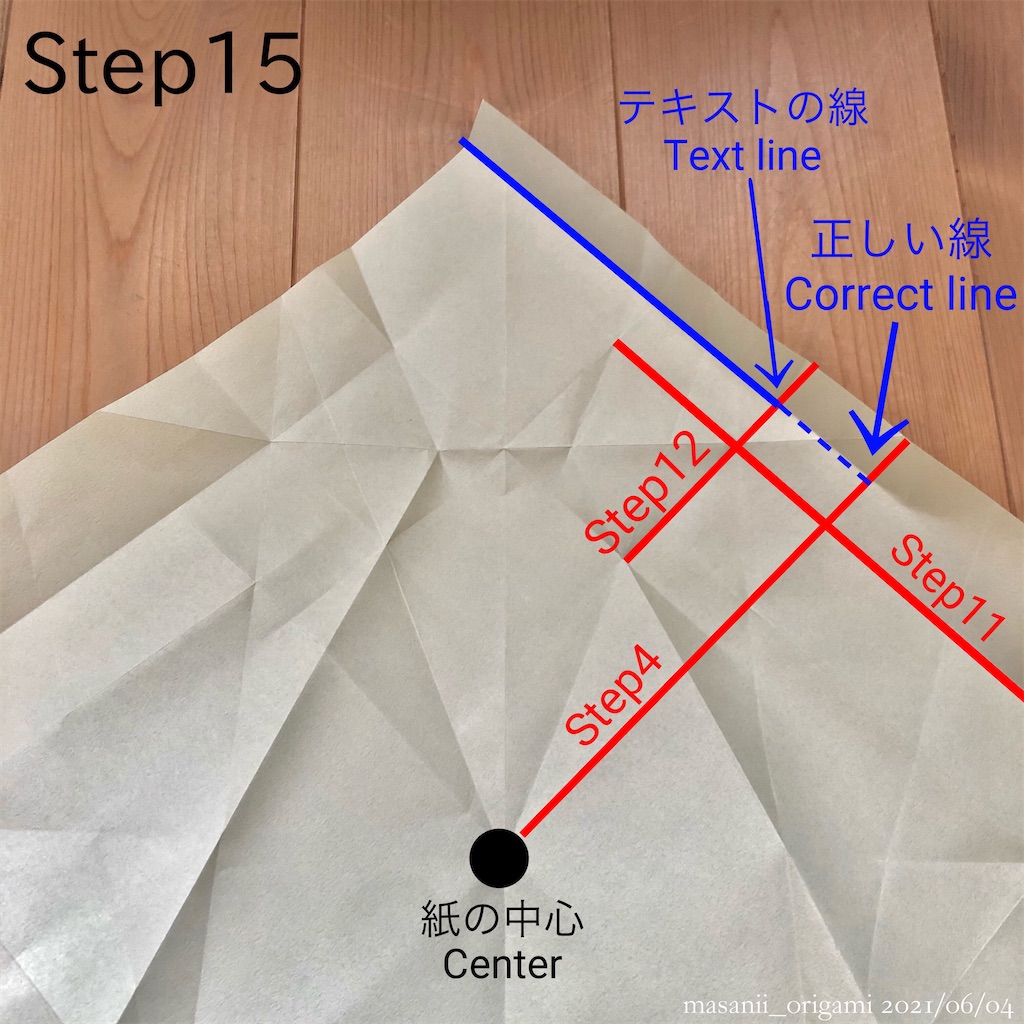
f:id:masanii_origami:20210604004948j:image

■Step15
Fold along Step11's crease.
There isn't any guide around the upper side, but you don't have to be nervous unless the balances of both sides is lost.
The problem is "how far to fold".
In textbook, crease stops at Step12's crease. However, actually you need to fold up to Step4.
(This crease will be the guide for Step30.)
This is a text error. You can check it on publisher's website. (link above)


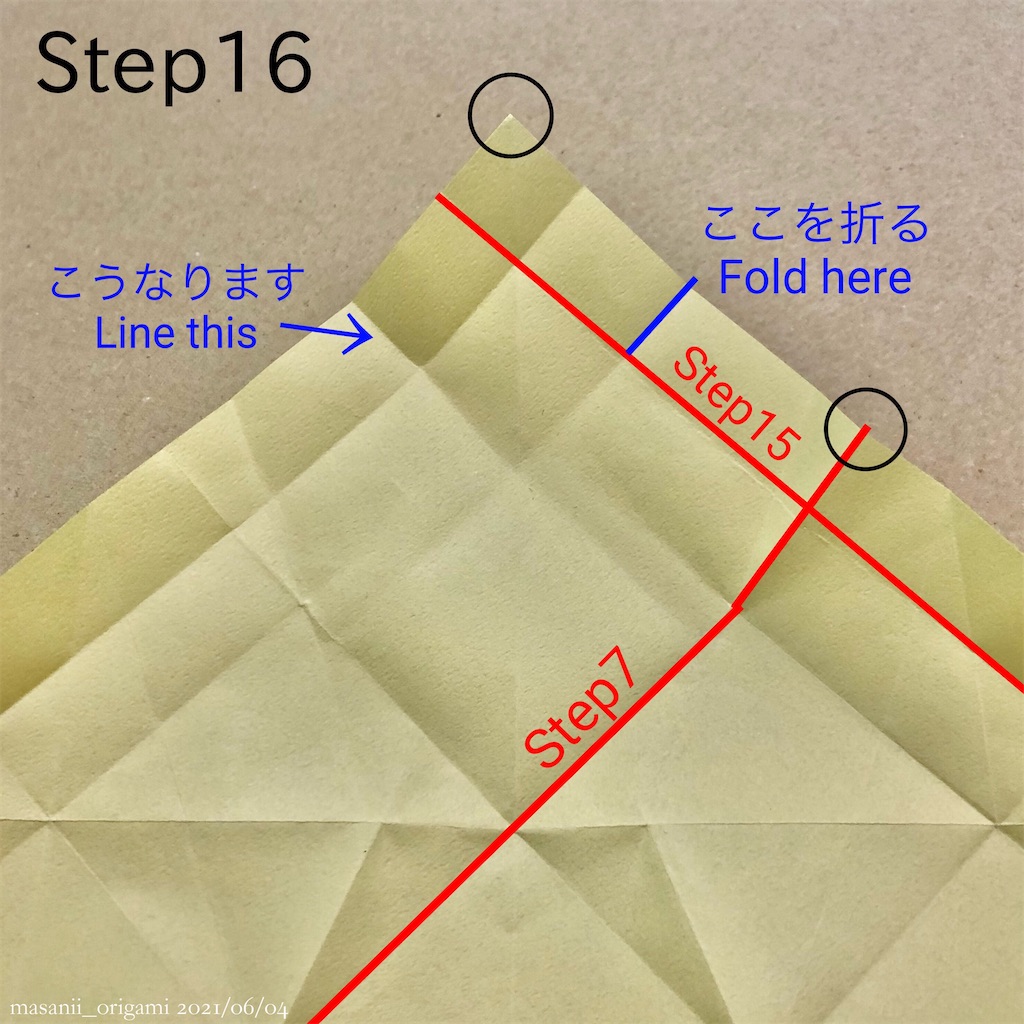
■工程16
「折り筋」とは、工程7で折った線のこと。
折る長さは、工程15で付けた線までです。 
f:id:masanii_origami:20210604005023j:image

■Step16
Fold along Step7's crease up to Step15's crease.


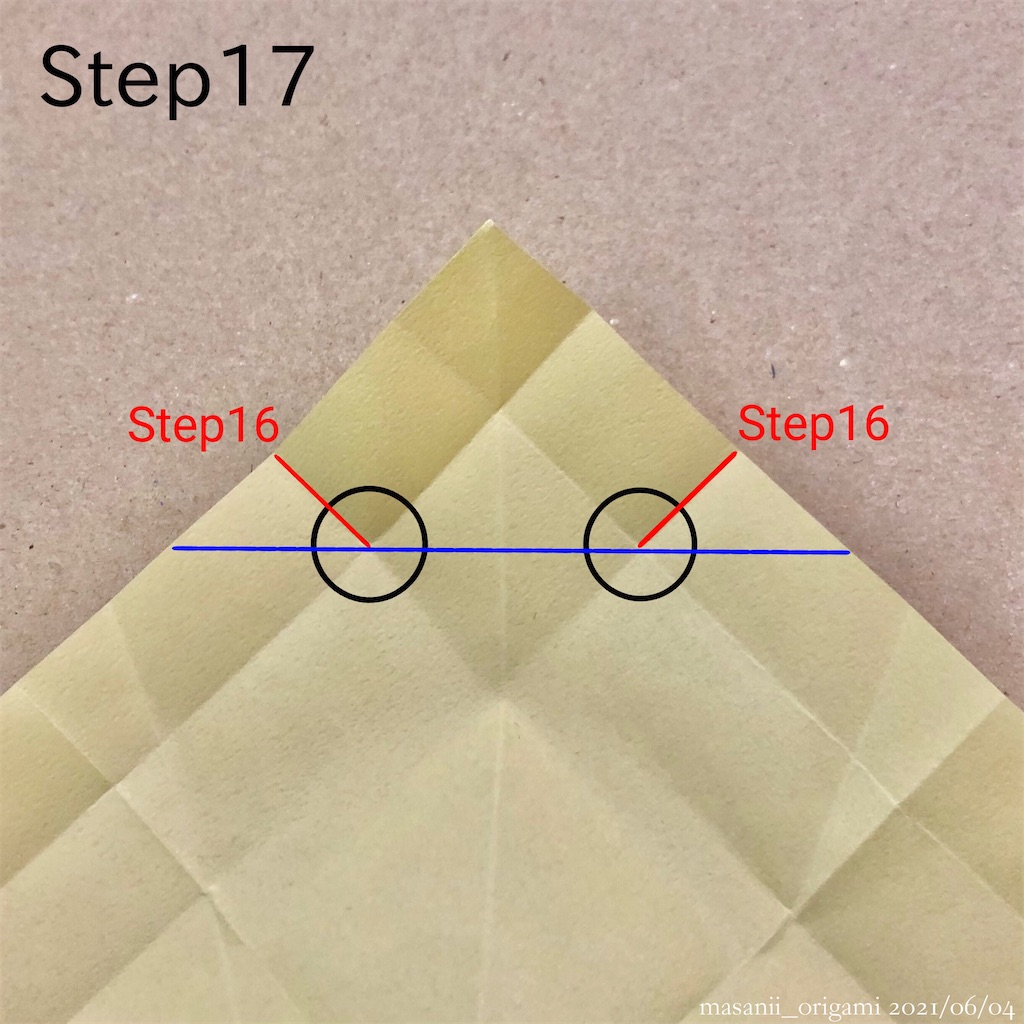
■工程17、両脇の◯
どちらも、工程16で付けた線の下端です。
f:id:masanii_origami:20210604005039j:image

■Step17, ◯ on both sides
These mean "Lower end of Step16's crease".


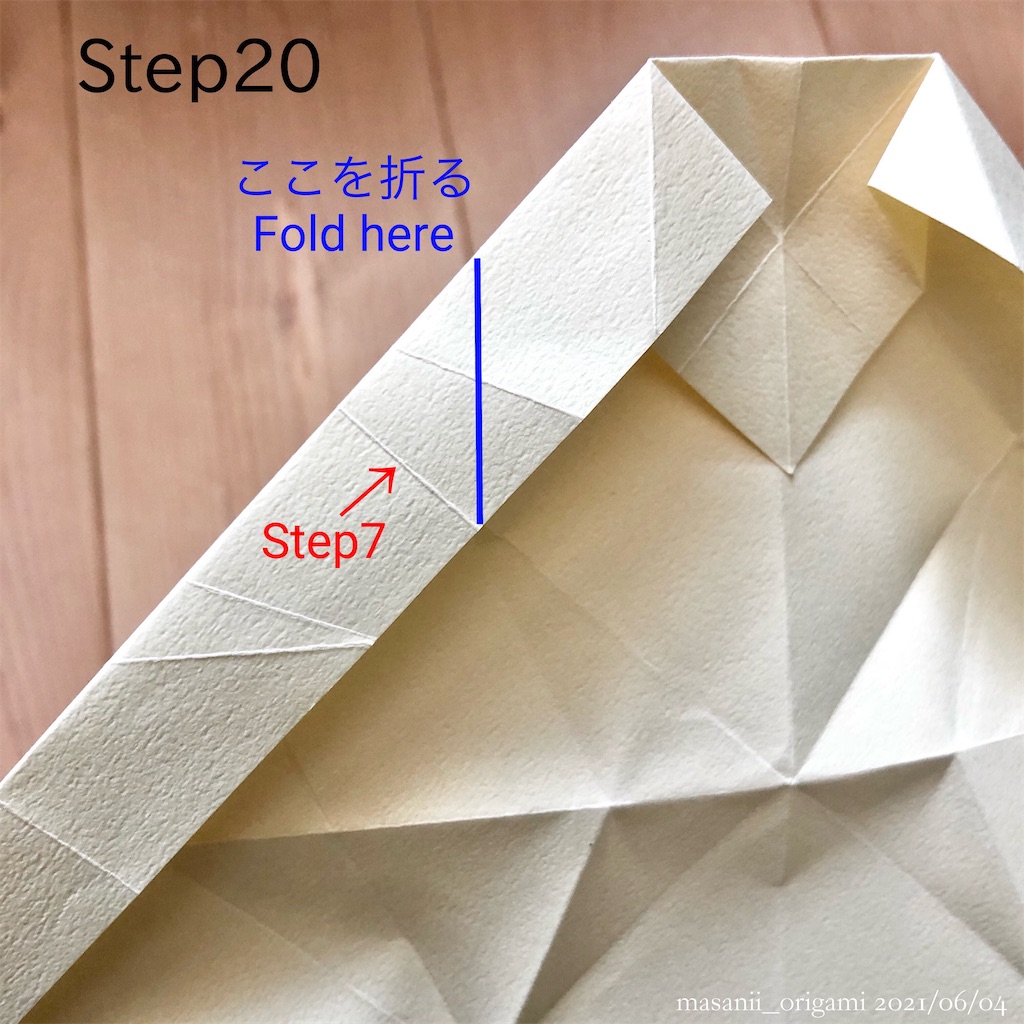
■工程20
リクエストがあった箇所です。
この線の根本は、「工程7の上端」でしょう。
「工程11の上端」でもあります。
実はここ、工程93で「ほっぺた」になる、段折りの赤い線(=山折り線)だったのです!
f:id:masanii_origami:20210604005059j:image

■Step20
I got an inquiry about this part.
Lower end of Step20's crease corresponds to "Upper end of Step7's crease". It's also "Upper end of Step11's crease".
In fact, this part will be "cheeks" at Step93.
There, this corresponds to red line (mountain fold).


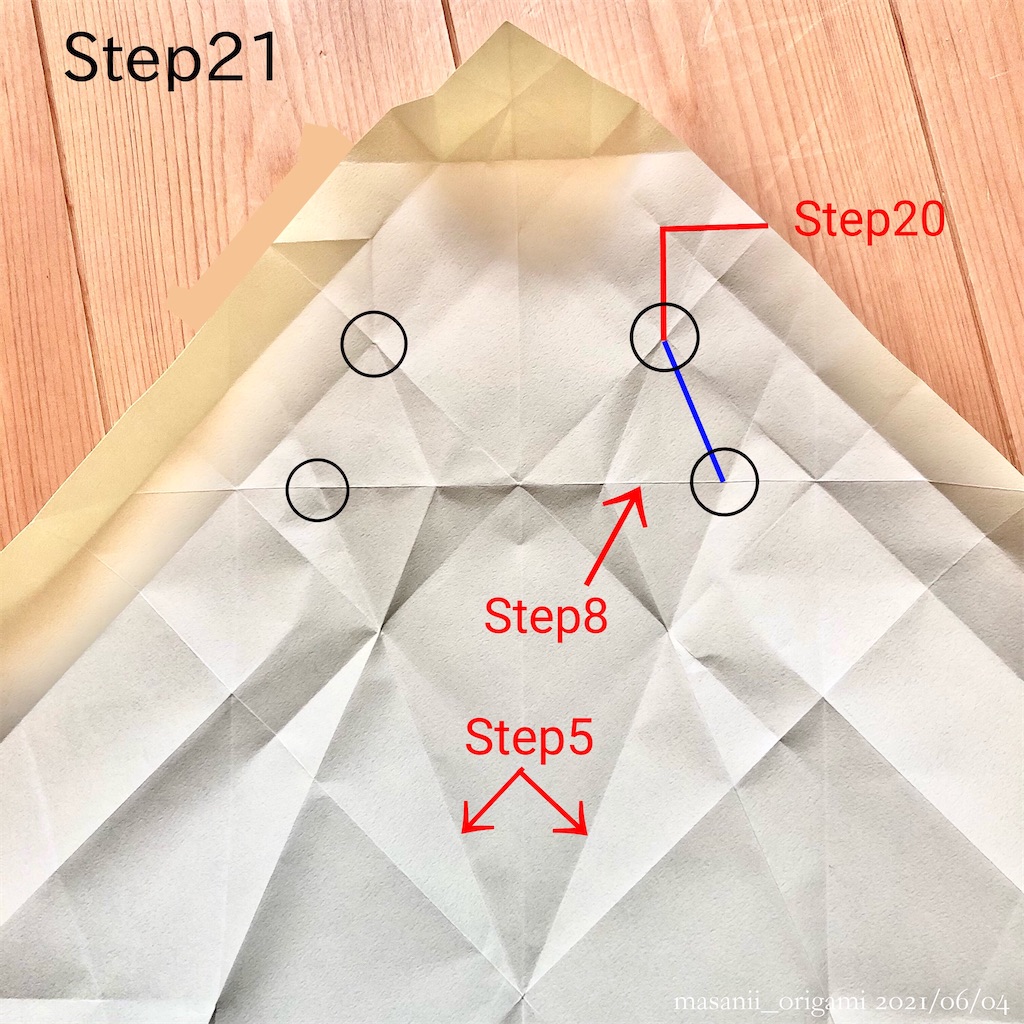
■工程21
上端は、先程の工程20の根本にあたります。
下端は、工程8のヨコ線を基準に見ましょう。工程5のナナメ線との交点が下端です。
これを折ると「ひし形が2つ」できます。
やった人なら、この意味が分かるはず。
f:id:masanii_origami:20210604005113j:image

■Step21
Upper end corresponds to the root of Step20's crease.
To Find Lower end, you should watch Step8's horizontal crease.
Lower end corresponds to Step5's crease and its intersection.
Folding this part, two rhombus will appear.
If you can fold correctly, you'll understand what it means.


■工程22
まず、下端の「⌒⌒」を見てみましょう。
コレの正体は、工程21の線です。
この中点が工程22の下端となるので、両端から折って、中点に印をつけておきましょう。
上端になるのは、工程7と工程15の交点です。
「つまむように折る」がやりづらい場合は、テーブルの縁を押し付けるように折るのがオススメです。
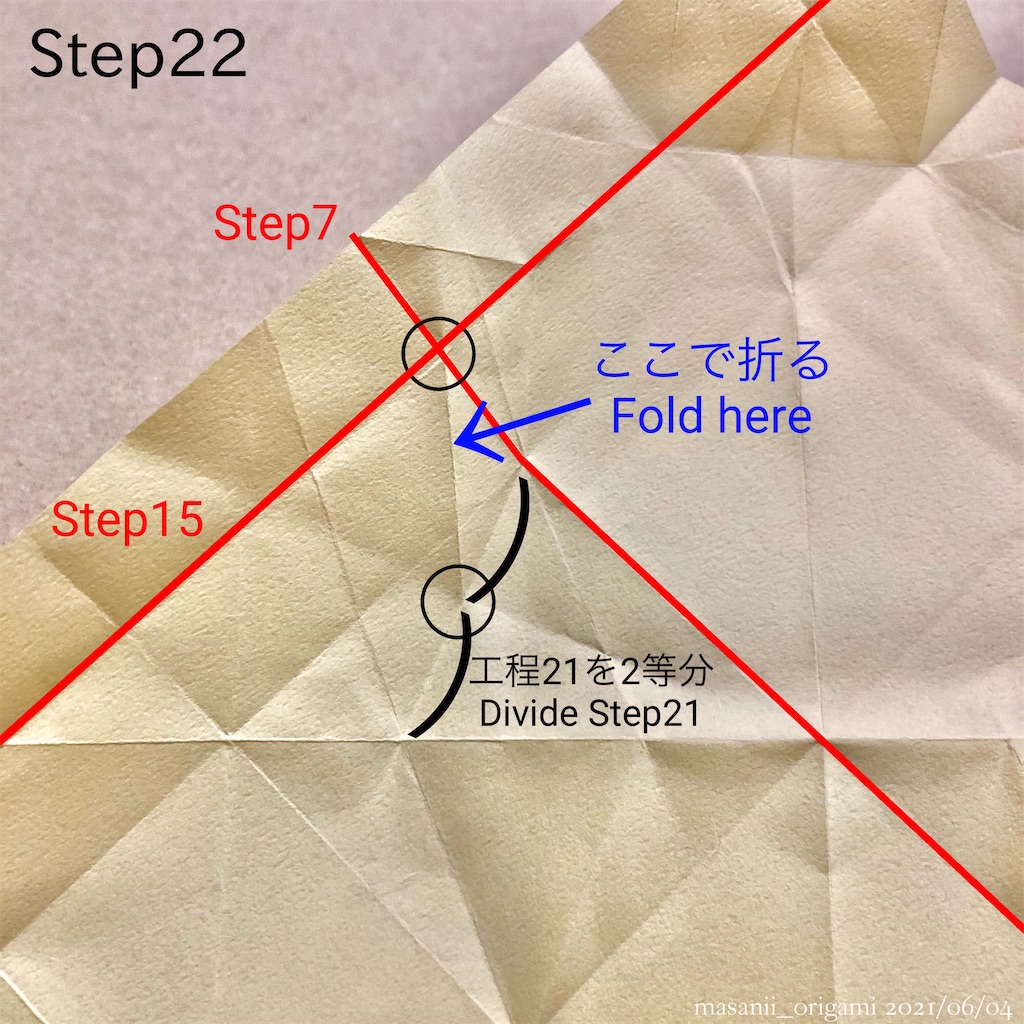
f:id:masanii_origami:20210604005130j:image

■Step22
First, look at the symbol "⌒⌒"
It's Step21's crease.
That is, the midpoint of Step21's crease will be Lower end of this part. So you should mark the midpoint by folding.
Upper end corresponds to the intersection of Step17's crease and Step15's crease.
If you feel difficult to fold like pinching, it's easy to press the paper against table.


■工程23
根本(下端)は、工程8のヨコ線と工程6のタテ線の交点。
工程6の線と工程11の線を合わせて、根本の角を2等分しましょう。
折る終点(上端)は、工程15のラインです。
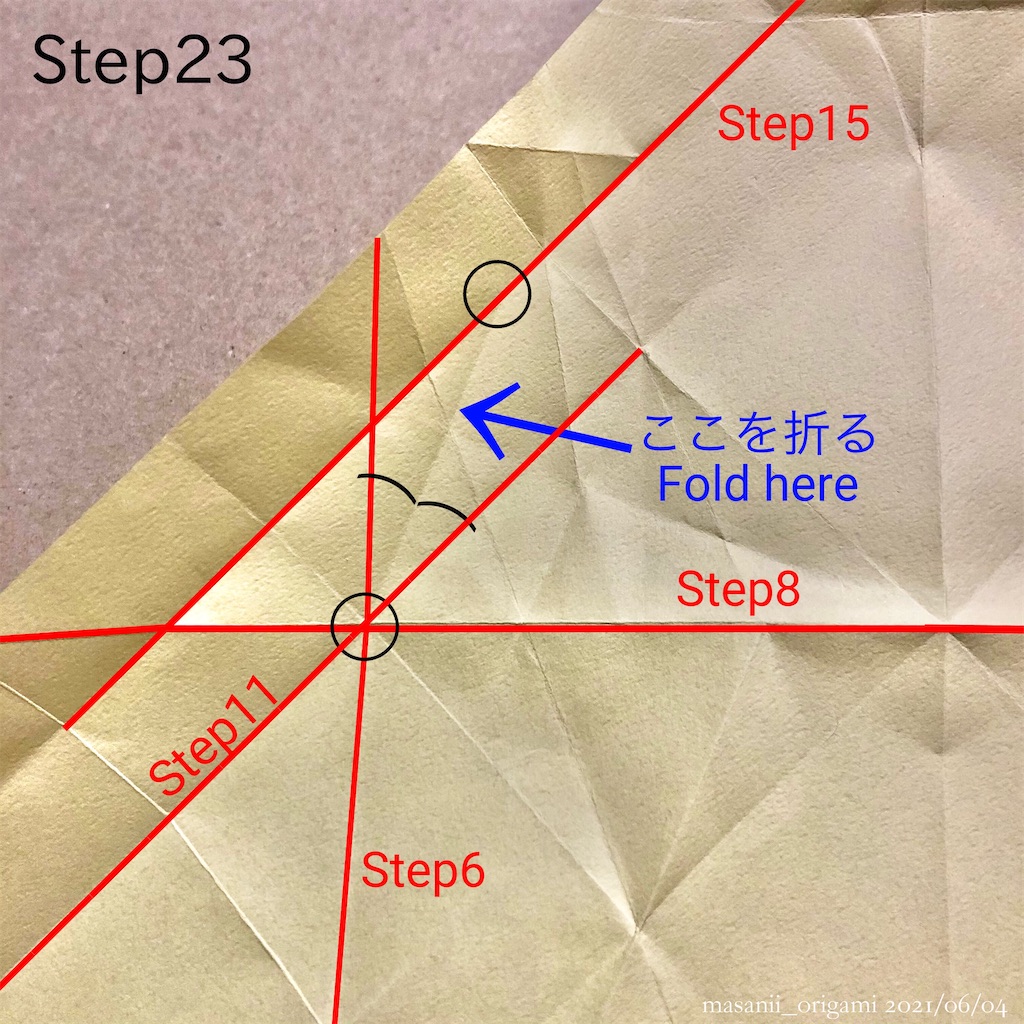
f:id:masanii_origami:20210604005147j:image

■Step23
Lower end corresponds to the intersection of Step8's horizontal crease and Step6's vertical crease.
Divide the root angle into two same angles, by matching Step6's crease and Step11's crease.
The end point to fold (Upper end) corresponds to Step15's crease.


■工程24
工程23で折った線の終点(上端)に注目です。
ここから、工程15のラインを軸に、対称になるように折ります。
線の終点(下端)は、紙のフチで工程12の端と繋がるはずです。二等辺三角形ができましたか?
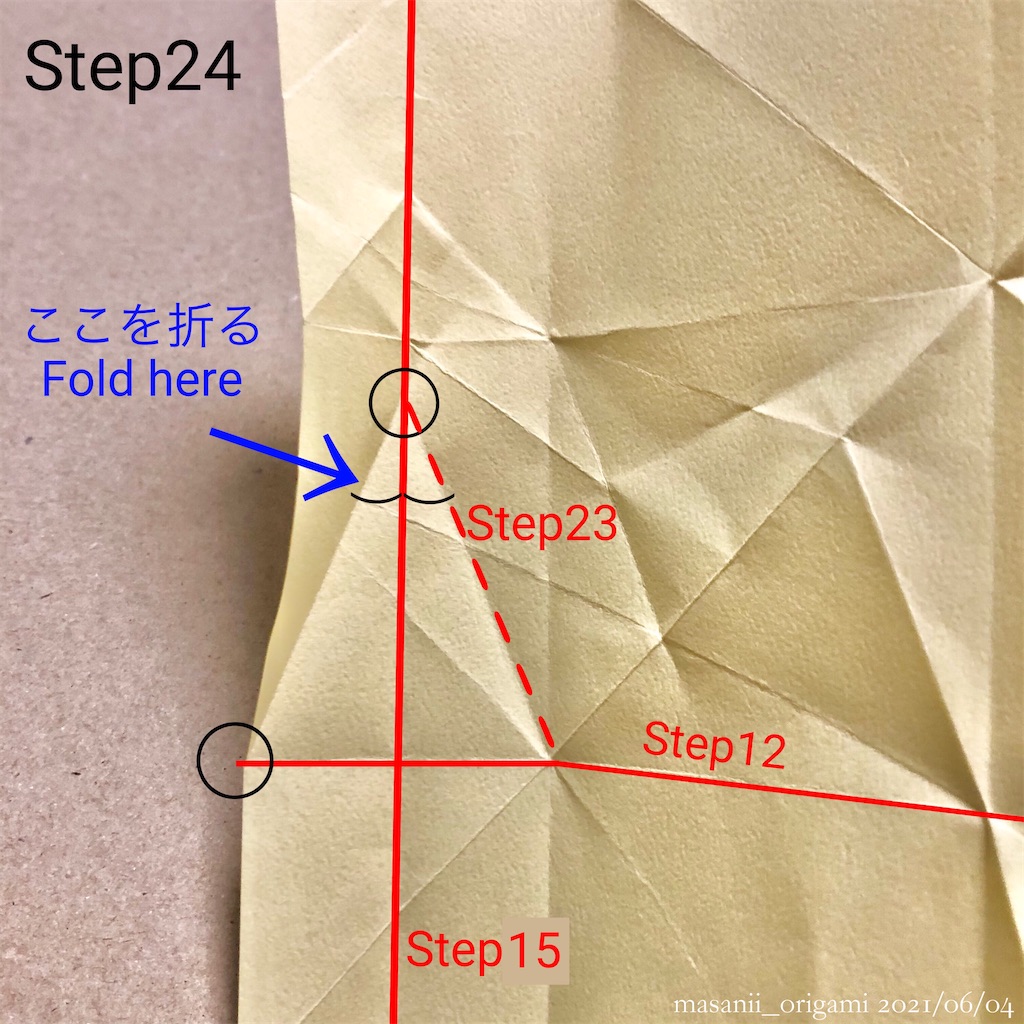
f:id:masanii_origami:20210604005206j:image

■Step24
Notice the end of Step23's crease (Upper end).
From this point, fold to be symmetrical around Step15's crease.
The end point to fold (Lower end) must connect with "Step12's end" on paper edge.
Can you see an isosceles triangle?


■工程30
下端の◯は、工程11と工程2との交点です。
上端は、工程4と工程15の交点。
テキストでは、15の線の長さが間違っている(=線の長さが足りない、前述15参照)ので、4の線とぶつかるまで延長させましょう。ここが上端となります。
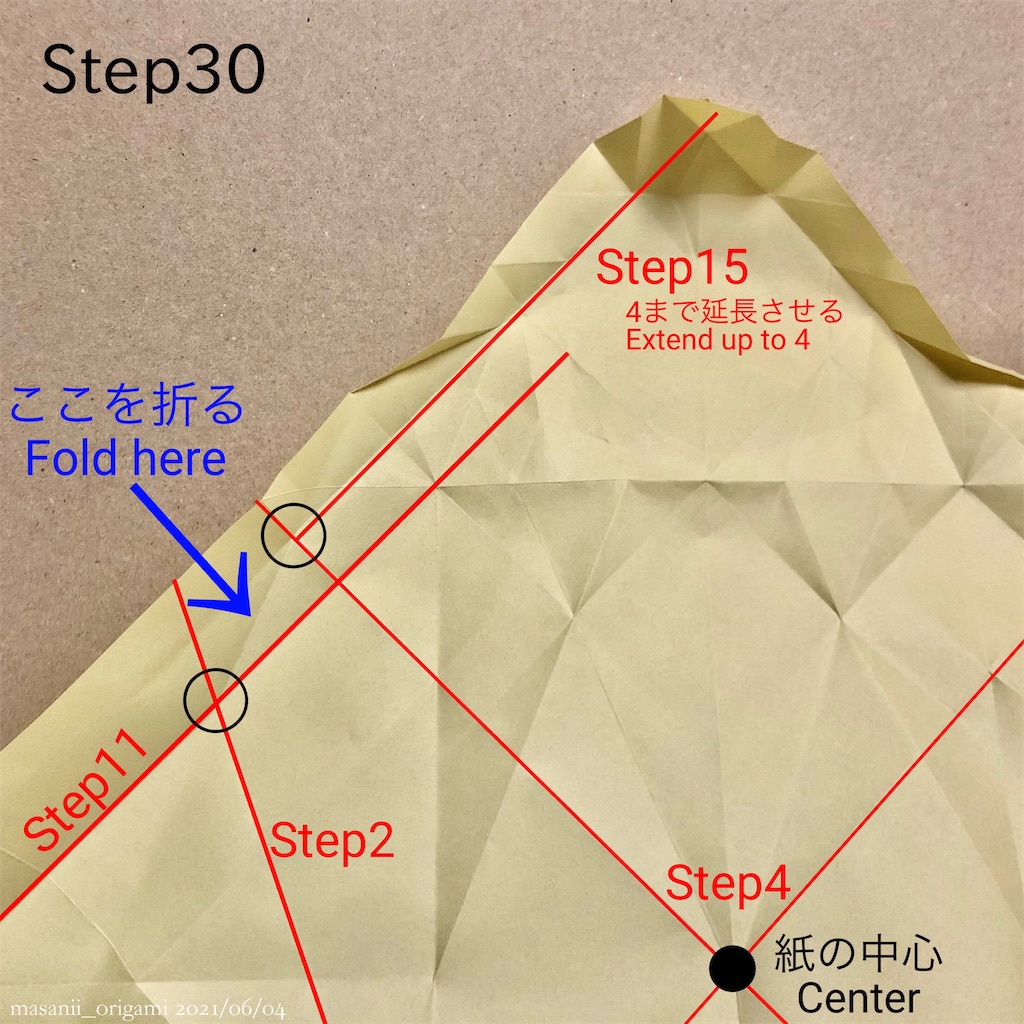
f:id:masanii_origami:20210604005225j:image

■Step30
◯ on Lower end, corresponds to the intersection of Step11's crease and Step2's crease.
Upper end corresponds to the intersection of Step4's crease and Step15's crease.
In textbook, the length of Step15's crease is wrong (=not long enough, read 15 above), so you should extend it up to Step4's crease.
This end point will be "Upper end".


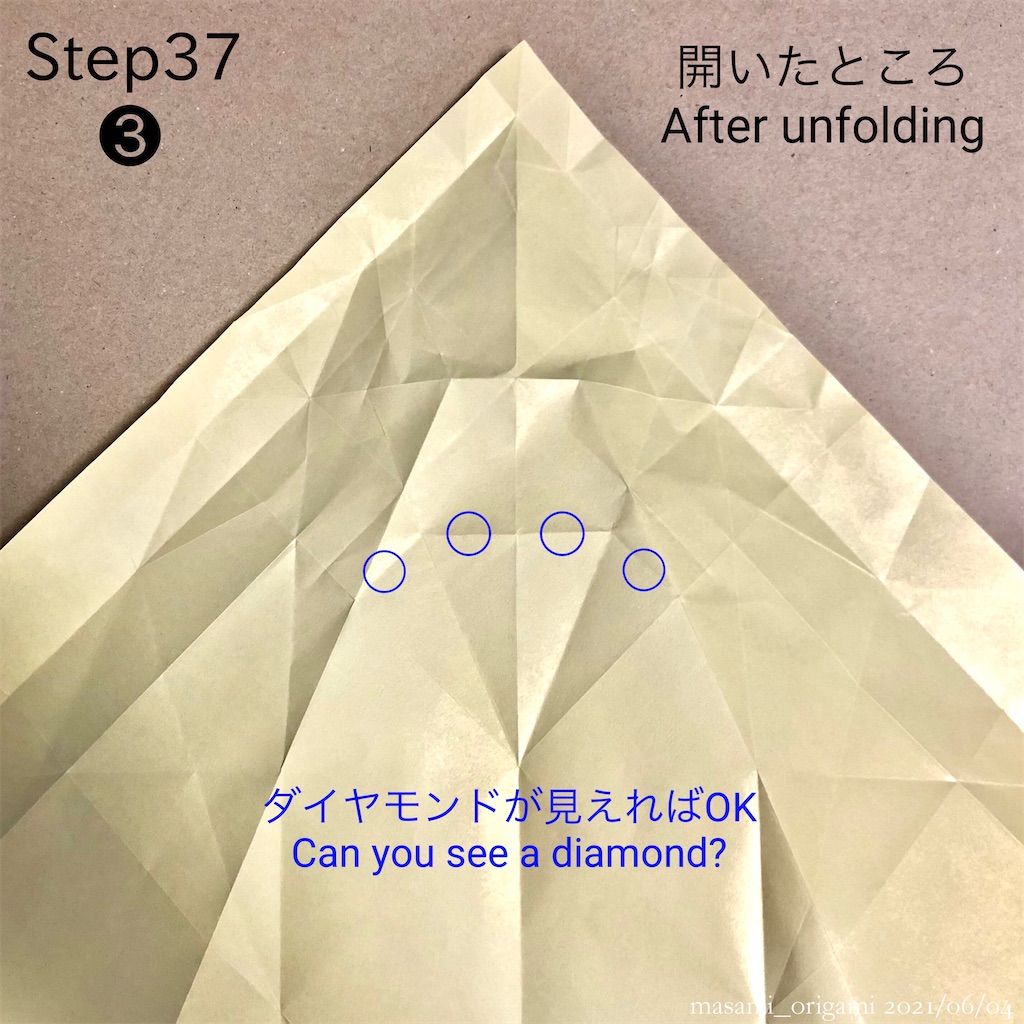
■工程37
折る根本は、下の線(工程4)のライン上にある、14のナナメ線との交点。
折る角度は、「根本(下の線)から直角」が正解です。
展開したときに、中央のラインが直線になればOK。中心に「ダイヤモンド」が見えます。
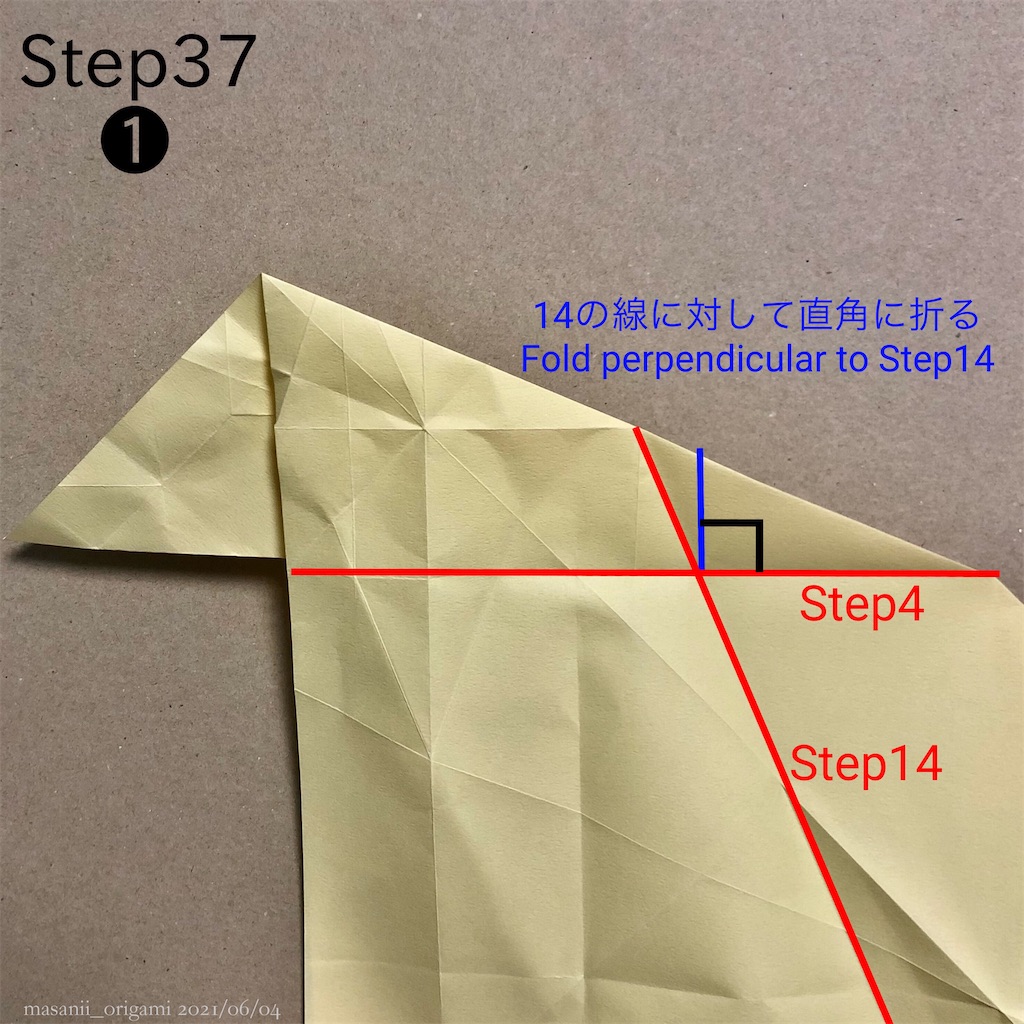
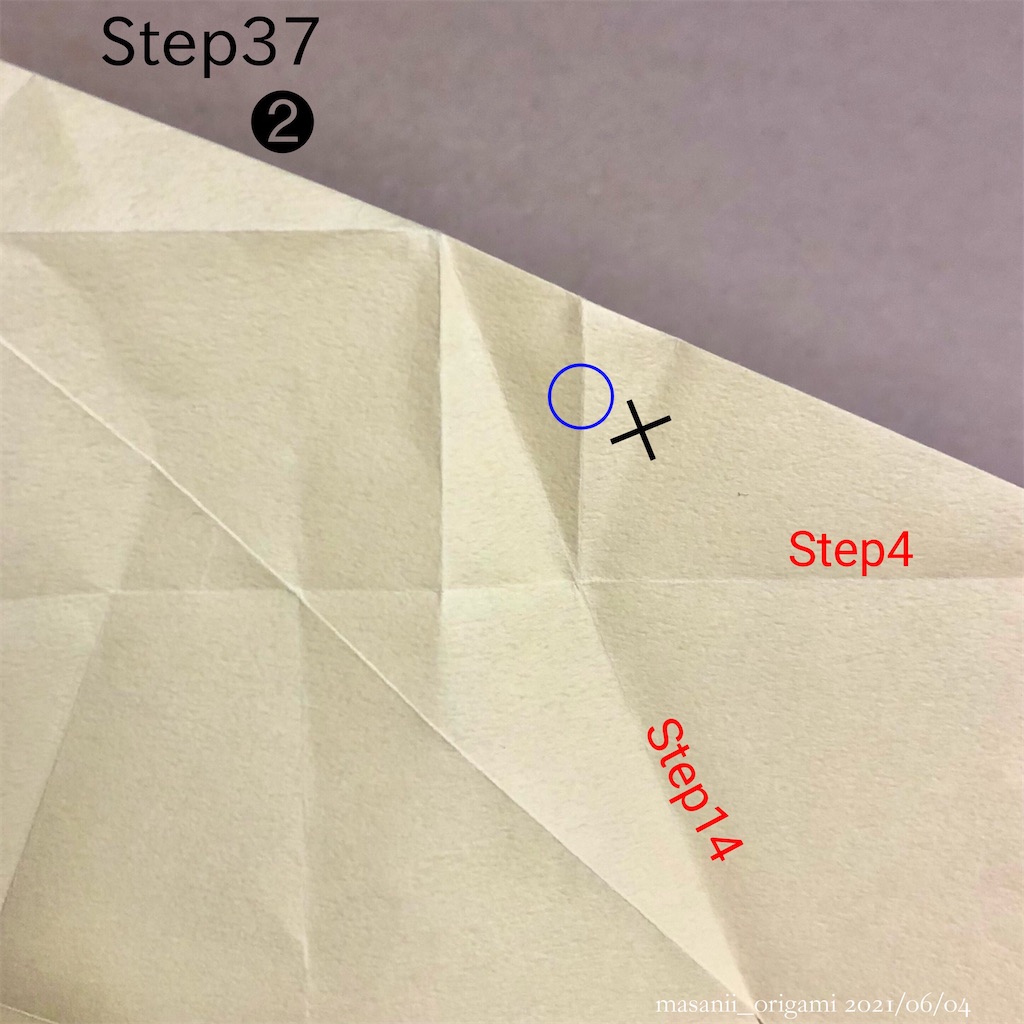
f:id:masanii_origami:20210604005248j:imagef:id:masanii_origami:20210604005257j:imagef:id:masanii_origami:20210604005308j:image

■Step37
The root to fold is the intersection of Step14's crease and the bottom line (Step4's crease).
The angle to fold is "perpendicular (=90°) to the bottom line".
It's OK if the center crease is straight when you open the entire paper.
You can see "a diamond" in the center.


■工程38
こちらは、根本から22.5°で折るのが正解です。
具体的には、
・37でつけた線の上側と、紙の中心(中割り折りの根本)の中点をつける
・37でつけた線の根本と、前述の中点を結ぶ線で折る
展開した時に「もみじ」が見えればOKです。
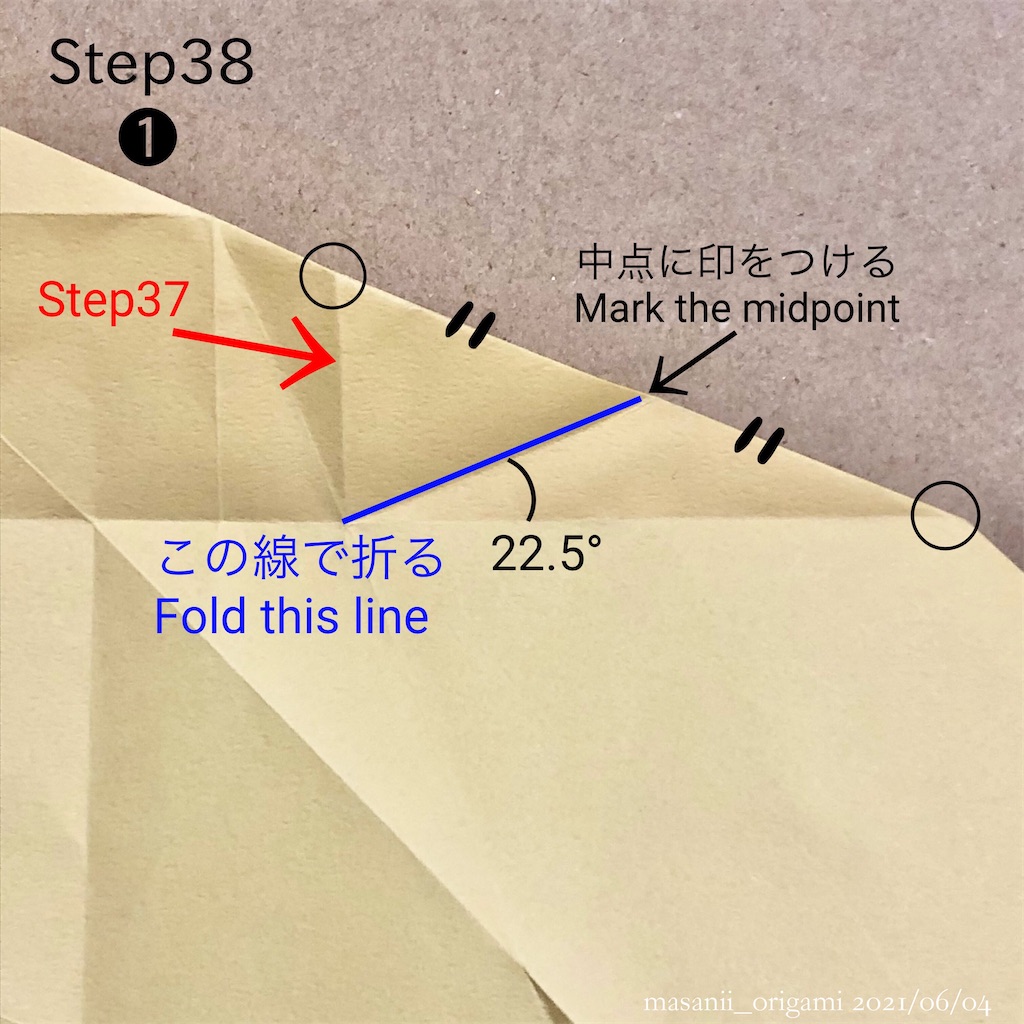
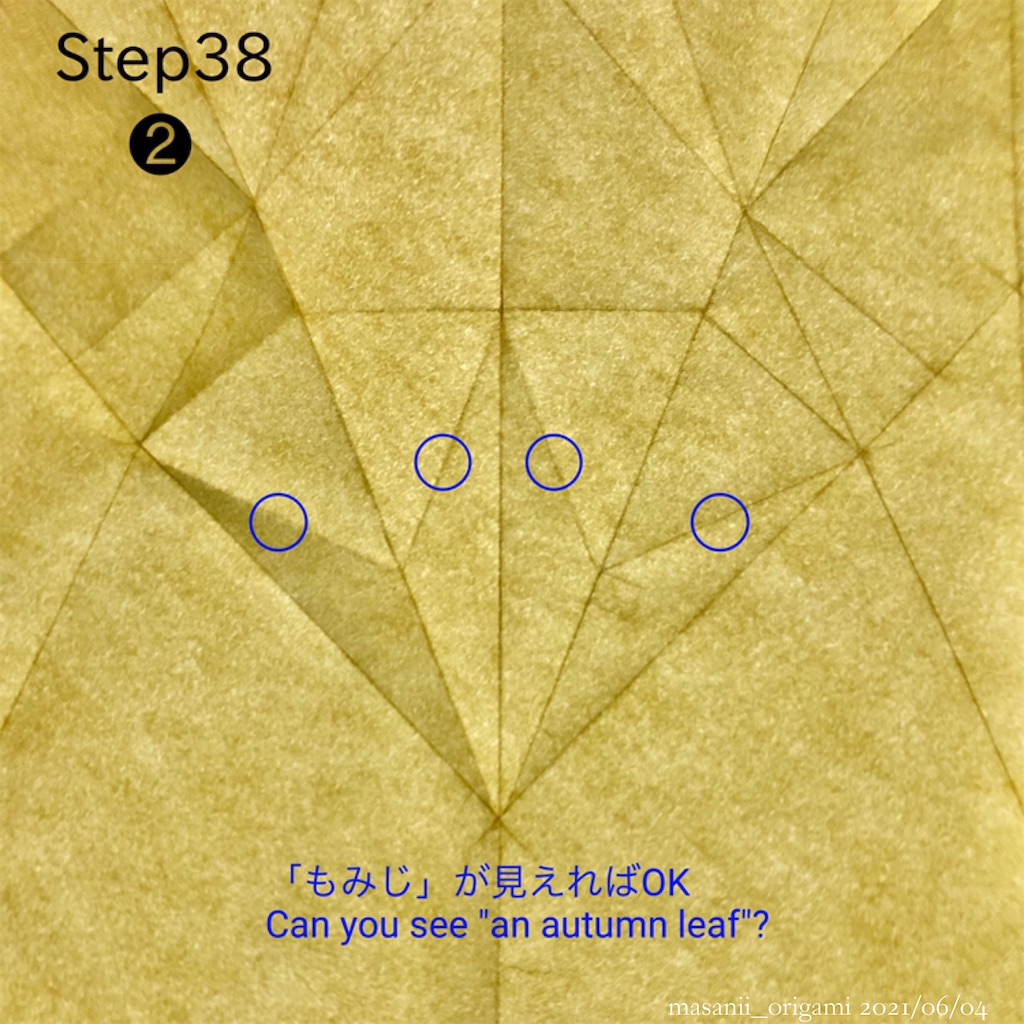
f:id:masanii_origami:20210604005330j:imagef:id:masanii_origami:20210604005338j:image

■Step38
In this part, you should fold 22.5° from the bottom line.
In particular,
・Mark the midpoint between "Upper end of Step37's crease" and "center of paper (=the root of inside reverse fold)".
・Fold along the line connecting "the root of Step37's crease" and "the point I mentioned earlier".
It's OK if you can see "an autumn leaf" when you open the entire paper.


☘️☘️☘️


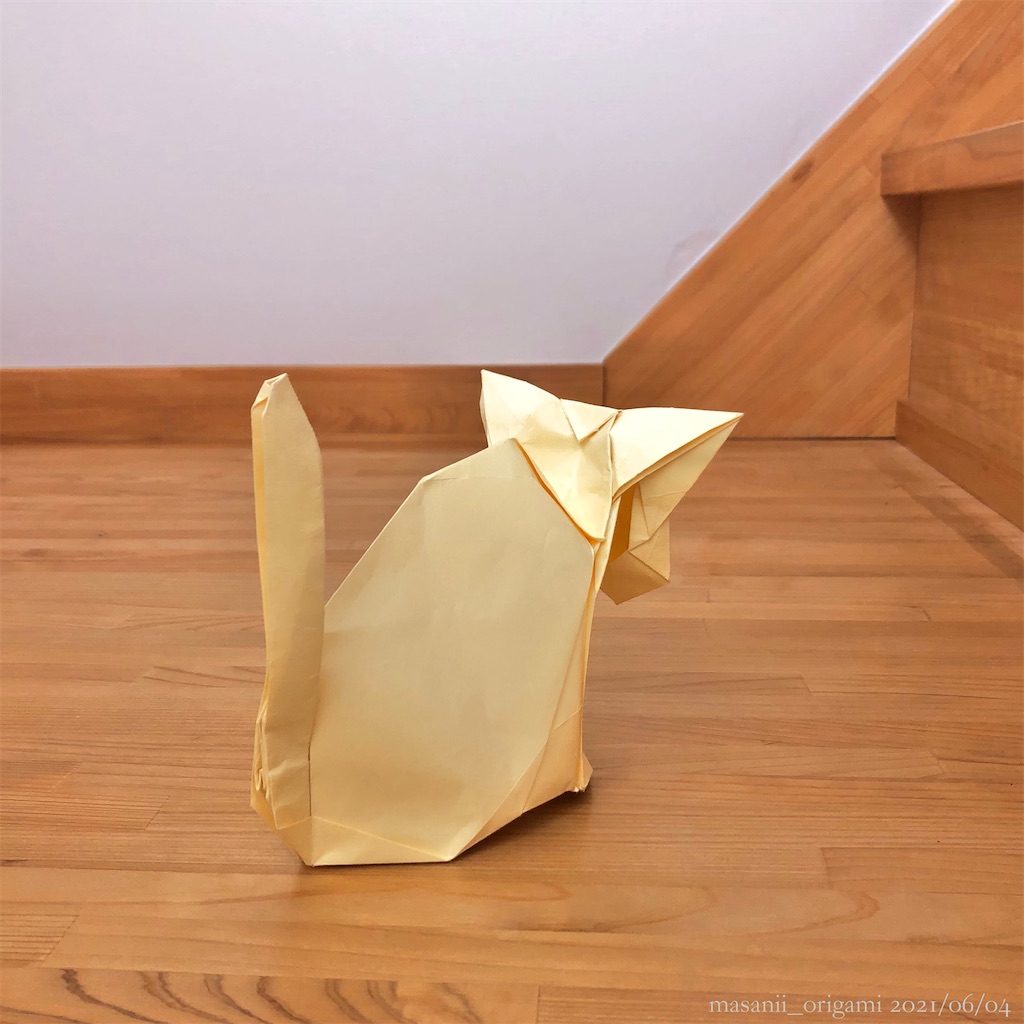
はい、今日はここまで!
無事に乗り切れましたでしょうか?

この後の組み立てもなかなか大変ですが、解説記事を書くには至らず。
解説するほど分析できていないのが、正直なところです。
(果たして、あのプロセスを言語化できるのでしょうか!?)
f:id:masanii_origami:20210603235118j:image

That's all for today!
Did you clear them without any problems?

After these processes, we have to assemble it, but I don't have enough skill to make an article about it yet.
My analysis has not progressed enough to explain the diagram.
(Will anyone challenge to do?)


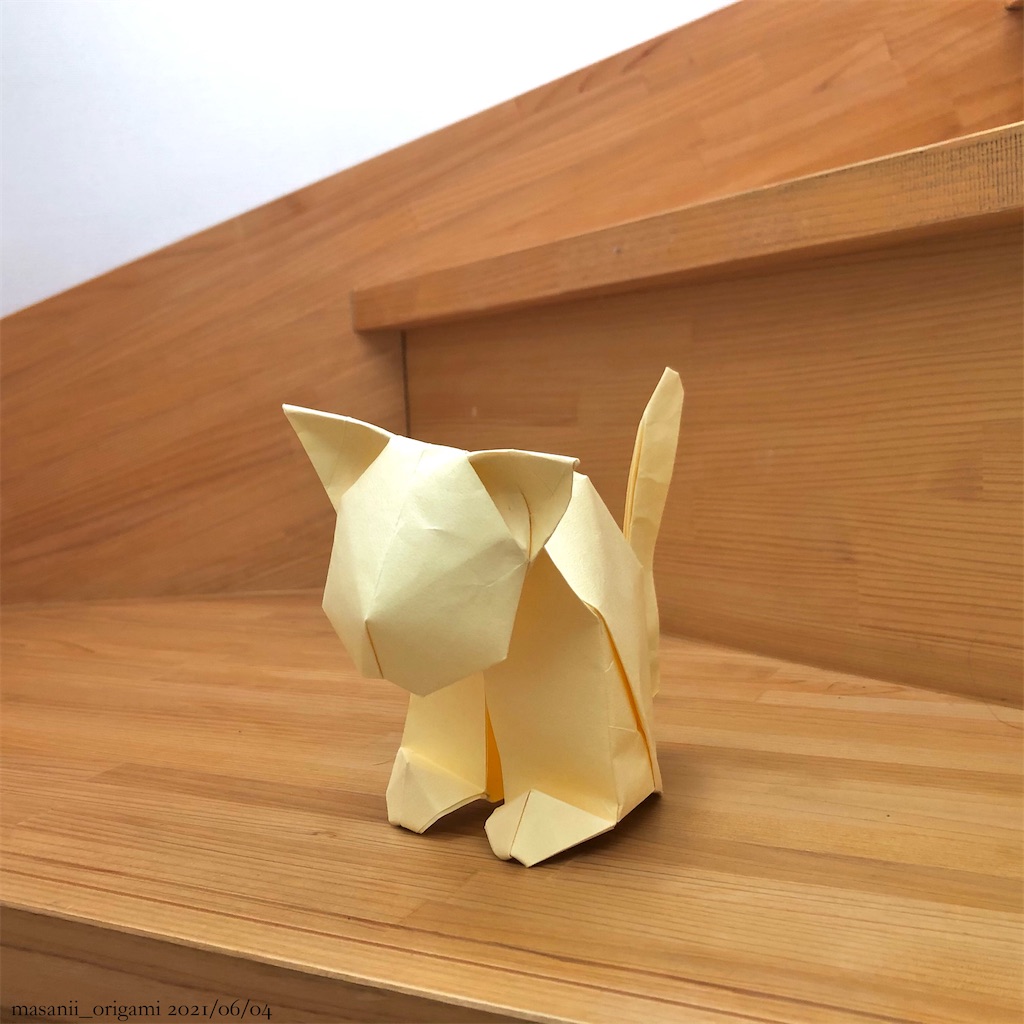
作れば作るほどキレイになりそうな予感がするので、今後も研究を重ねていきたいと思います。
皆さんも、何か工夫しているポイントがあれば、お寄せいただけると嬉しいです。
f:id:masanii_origami:20210604001853j:image

I'm sure that I improve with each trial, so I'll continue to study from now on.

I'm happy if you share any ideas.


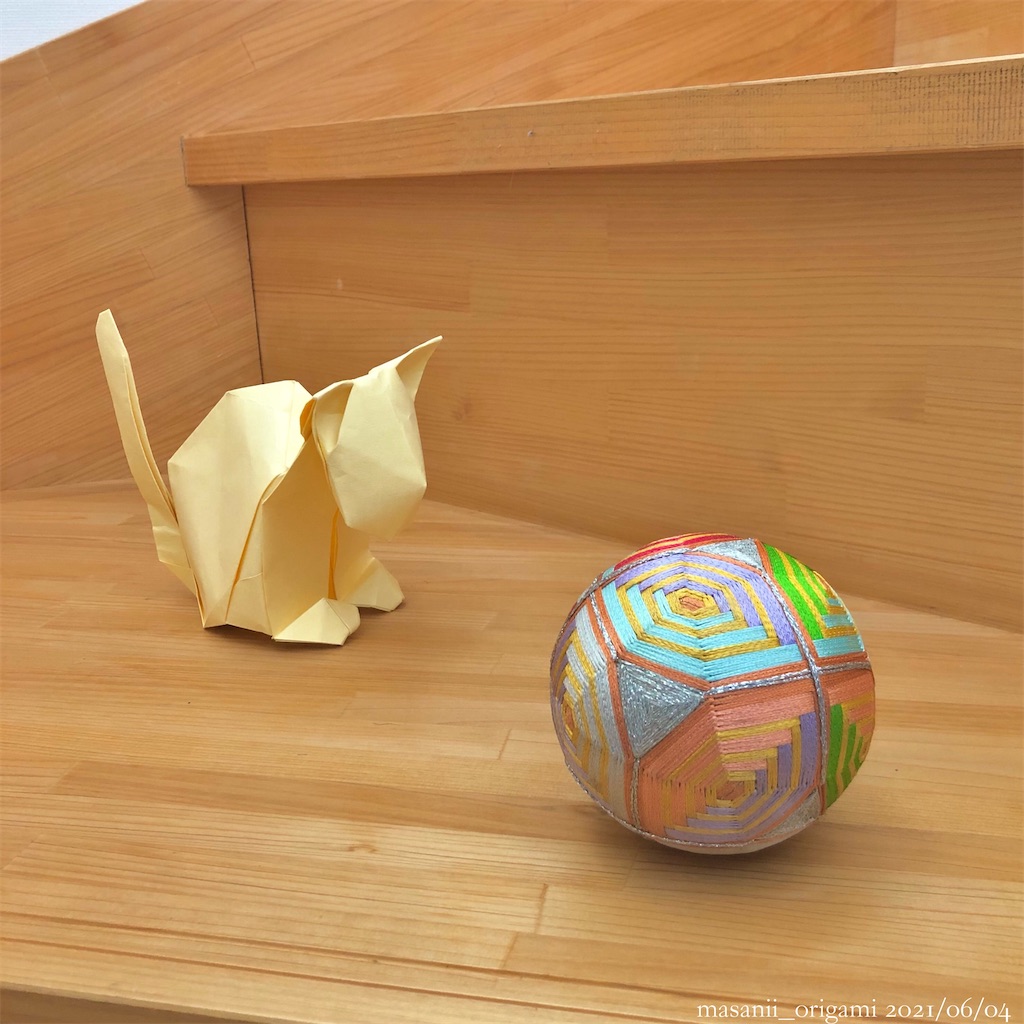
この記事を書くにあたり、有澤悠河さんご本人に申し入れをしたのですが、掲載確認だけのつもりが、助言までいただいてしまいました。
特に工程37・38に関しては、構造から角度まで細かく教えてくださり、感謝しきりです。
KADOKAWAさんの正誤表を教えてくれたのも有澤さんです。)

いただいた貴重な情報は、本記事に惜しみなく盛り込み、皆さんにシェアさせていただきました。
末筆ながら、この場をお借りして御礼申し上げます。
この素晴らしい作品が、より多くの人に親しまれることを願っております。
f:id:masanii_origami:20210604001913j:image

In writing this article, I confirmed with Mr. Arisawa. However, he not only accepted to write an article, but also gave me some advices!
Especially regarding Step37 & 38, he thankfully showed me details about their structures and angles.
(He also told me the errata of textbook.)

I have shared this article generously incorporating his valuable information.
I'd like to express my special thanks to him again.
I hope this wonderful model will be familiar to many fans.


それでは、アトリエまさにぃで、またお会いしましょう。
See you again in Atelier masanii:)
 

ユニット折り紙「ネモフィラ」で春(初夏?)を満喫!/"Nemophila" designed by Tomoko Fuse

f:id:masanii_origami:20210506082800j:image

アトリエまさにぃへ、ようこそ。

今日は、同じパーツを組み合わせて作る「ユニット折り紙」をご紹介します。

ユニット折り紙といえば…
そう、みんな大好き、布施知子さんです!
布施さんの作品をきっかけに折り紙にハマった人、多くいらっしゃるのではないでしょうか。

Welcome to Atelier masanii.
Today I'll introduce "Units" that consists of multiple identical parts.
Speaking of "Units", you might think of Ms. Tomoko Fuse, the master.

I know many people became obsessed with Origami since encountering her great works.


今回のテキストは、初心者の方にもオススメの書籍「はじめてでも組める くす玉おりがみ」です。

作品名はネモフィラ

春の爽やかな青空に、清潔感のあるオフホワイトを組み合わせました。
使った素材は、セリアの「マーブル」です。
ちょっと旬な季節から遅れてしまいましたが…まぁ、良しとしましょう!

The textbook which I used this time is especially suitable for beginners.
"Nemophila", I combined fresh sky blue & clean off-white.
I used the material "marble" in Seria store.
It may be a little out of best season, but it's OK!


☘️☘️☘️


さて、解説です。

この作品は、2種類の異なるカラーを組み合わせて、ひとつのユニットを作ります。
寸法はどちらも、1:2の長方形。
必要な枚数は、各色30枚です。

今回は、
15cm×15cmを2枚ずつ用意し、それぞれを3×3等分=9等分。
これで5cm×5cmの正方形が各色18枚できます。
それを2等分して、2.5cm×5cmを各色36枚用意しました。

こうすると、完成形は直径8cmくらいの手頃なサイズになります。
何より、必要な紙が各色2枚ずつで済むのが便利なところです。

f:id:masanii_origami:20210506082852j:image

Now, let me explain about this model.
It needs two different colors to make one part.
Paper size ratio is 1:2 rectangle, and it needs 30 sheets each.
Today I cut two 15cm×15cm papers into 9 squares each.
This way I got 18 5cm×5cm square papers each.

After that, I cut them in half and got 36 rectangles each.
The finished product is about 8cm in diameter, just the right size.

It's also notable that I needed only 2 papers for each color.


組み合わせのコツは、あらかじめスキマを作ってから挿し込むこと。

爪楊枝を刺しっぱなしにして、スキマを空けたままパーツの先端を入れます。
(先端の上側には、スティックのりを付けておきます)

途中で爪楊枝を引き抜いて、そのままパーツを奥までイン。
(私はパーツを挿し込むのに両手を使うので、爪楊枝は口で引き抜いています)

だんだん組み立てがタイトになってきますが、この方法なら幾分やりやすくなるでしょう。
これらは私なりのメソッドですが、皆さんが独自に工夫されているポイントがあれば、ぜひ教えてください。

f:id:masanii_origami:20210506082839j:image

I'll show you some tips about assembling.

First, insert after making a gap in advance.
Specifically, leave the gap open by stabbing a toothpick, and insert the tip of a part there.
(In advance, glue the surface of a part.)

Pull out the toothpick on the way and insert a part all as it is.
(In my case, I use both hands to assemble, so I pull out the toothpick with my lips.)

Assemble work becomes tight gradually, but you can do somewhat easy in this way.
These method are just my idea, I'm glad if you show me your own ingenuity.


最後に。

パーツを二つ折りにした際、内側が重なって潰れてしまうのが悩みのタネでした。
20個くらい作って気付いたのですが…
白い方のパーツにある細工をすると、解決する事が判明しました。
それは、外側の折り目をずらすこと。
(詳しくは写真参照)

裏側から親指を突っ込んで、中心線から1〜2mmのスキマが空くまでずらします。
すると、二つ折りして紙が内側へ引き寄せられても、お互いに重なりません。
余裕のある方は、ぜひ取り入れてみてください。

f:id:masanii_origami:20210506082827j:image

Finally, I had been annoyed that papers on both sides often overlap at the centerline.
I solved that by adding a certain action to inner white part.
The action is sliding the outer edge creases to the outside.
(See photo in details)

Insert thumb from inside, and slide crease to the point which is 1mm away from the centerline.
Then, both papers don't overlap easily, even if they are drawn to the centerline when they fold in half.

I noticed the above fact when I was making about 20 parts.

Try them if you can afford to do!


ところで。

各色36枚(=72枚)用意したのはいいけど、当然ながら6枚ずつ余るんですよね。
どうしよう。手裏剣でも作ろうかなぁ…

By the way, I got 36×2=72 rectangles to make this model. Of course there are now 12 extra. I'm wondering what to make... How about Shuriken!?


☘️☘️☘️


布施知子さんのユニット折り紙より「ネモフィラ」、いかがだったでしょうか?

私は普段「1枚もの」を折ることが多いのですが、とある方からのリクエストがきっかけで久しぶりにトライしてみました。

絵柄のチョイスからパーツ製作、組み立て作業…
これらユニット折り紙ならではの工程は、アクロバティックな複雑系にはない面白さがあります。

置いてよし、吊るしてよし、箱に詰めてもよし。
これからの「おうち時間」に、くす玉の花を添えてみませんか?

f:id:masanii_origami:20210506082815j:image

Did you enjoy "Nemophila" from Units by Tomoko Fuse?

I usually play One-paper products, but this time my friend requested me, so I decided to try.

Selection of pattern, making many parts, and assemble... An unique processes to Units are also interesting, not found in other complex works.

It's also nice to put, hang, or box.

You should add Kusudama Origami like this to your time at home!


それでは。
アトリエまさにぃで、またお待ちしております。

See you again in Atelier masanii:)


折り紙でアルコール消毒!?ポンプが動く衝撃作品「シャンプーボトル」/Shampoo Bottle with moving pump

f:id:masanii_origami:20210424231311j:image
アトリエまさにぃへ、ようこそ。
今日ご紹介するのは、加藤駿さんの「シャンプーボトル」です。


f:id:masanii_origami:20210424231442j:image

Welcome to Atelier masanii.
Today I'll introduce "Shampoo Bottle" designed by Shun Kato.


うん。
この時代、どう見ても、アルコール消毒のアレにしか見えません。
なんてタイムリーな題材なんでしょう!


Especially in recent times, no matter how we look at it, it's an alcohol disinfectant.
What a timely model!


紙の弾力のみでポンプが上下するギミックは、見事としか言いようがありません。
裏側を覗くと、ポンプ動きによって、周辺の紙がたわむ様子が観察できます。
素晴らしい設計です。


It's a wonderful design that the pump moves only by paper elasticity.
Looking into the bottom, you can find that surrounding papers are bent by the pump action. Great!


初見のトキメキはもちろん、完成品を目の前にすると本当に感動します。
定期講座、図書館、職場、そして妻にも大ウケでした。
加藤さん天才。ほんと天才。面白すぎる。

f:id:masanii_origami:20210424231218j:image

I fell in love with it at the first sight, but I was even more fascinated when completed.
Designer Mr. Kato, his idea is really genius!!


☘️☘️☘️


出典は、名著「高雅な折り紙」

7ページ・91工程と結構ハイレベルですが、この最高レベルの面白さは挑戦する価値アリアリでしょう。
テキスト中の難度は、中程度の★★★⭐︎⭐︎(星3つ)です。

Textbook is "The Elegance of ORIGAMI", the masterpiece.
It's quite difficult, requiring 91 steps (7 pages), but its supreme fun is worth trying.
Difficulty in the textbook is "Level 3 (moderate)".


ネタバレにならない範囲で、工程を写真に撮りましたが…本当に1枚の紙からできているんですねぇ。

f:id:masanii_origami:20210424231142j:image
I took some photos not to infringe the copyright. I was surprised again that this is made of only one paper!


本来ならノリを使わずにピタッと閉じるのですが、私の作りが甘かったのか、ノズルが後ろに倒れやすくなっていたので、首の後ろと外周は接着しました。
これで耐久性もバッチリ。心置きなくシュコシュコできます。


Originally there's no need to use glue anywhere, but I did on the back of its neck and around its body because the nozzle tended to tip over backwards.
I think my work may not have been perfect...
Anyways, these measures have increased durability.
I can move the pump without worrying about losing its shape.


今回は単色で揃えましたが、絵柄つきの折り紙や、千代紙などを使っても良さそうですね。

f:id:masanii_origami:20210424231104j:image

I made them with single colors at this time, but it may be also nice if you try various patterns.


☘️☘️☘️


コロナの情勢がなかなか良くならず、気分もモヤモヤ。周囲はマスクだらけで、どこへ行っても消毒消毒。
春の雰囲気をもっと満喫したいけれど、やっぱり閉塞感がありますよね。

I'm fed up that the situation of COVID-19 has not improved yet. Everyone is wearing a mask, and there're alcohol disinfectant everywhere.
I want to enjoy spring more, but there's feeling of blockade.


そんな時にこそ、本作のようなコミカル作品を折ってみませんか?
本物のアルコールスプレーは飽き飽きしているのに、折り紙なら不思議と和んでしまいます。

Now, it's time to make funny works like this!

We're tired of real alcohol disinfectant, but once making it with Origami, we feel peaceful curiously.


ポップでかわいいシャンプーボトルを無心でシュコシュコしていると、些細な事はどうでも良くよくなってしまいます。
みんな面白がってくれるので、周りの雰囲気も明るくなる事でしょう。

When we're moving a cute bottle without any thinking, we don't worry about trivial things.

Everyone must be amused, so the mood around you will be brighter!


このコラムをお読みの貴方も、ぜひチャレンジしてみてください。

You should check & try.


それでは、またお会いしましょう。

See you again in Atelier masanii:)


水しぶきも折り紙で!ライアン・ドンさんの「クジラ」/"Whale" designed by Ryan Dong

アトリエまさにぃへ、ようこそ。

Welcome to atelier masanii.

f:id:masanii_origami:20210417084028j:image


すっかり春らしい気候になったと思ったら、朝晩はまだまだ寒い日が続きますね。
風邪などを引かないよう、お気をつけてお過ごしください。

It's been a season when you feel the warmth of spring, but still cold in the morning & night.
Take care of yourself not to catch a cold.


さて、今日ご紹介するのは、アメリカの作家、ライアン・ドンさんの「クジラ」
24cm×24cmで折ったら、ちょうど手乗りサイズになりました。

I'll introduce "Whale" designed by Ryan Dong from USA.
With 24cm×24cm paper, it became palm sized.


背中から上がる水しぶきまで一枚で表現した、素晴らしいデザインです!
クジラの折り紙は色々ありますが、この発想は珍しいですよね。
コロンと立体感のある体もかわいいです。

What a wonderful design that expresses even whale squirting with one paper!
It's an unique idea among various origami whales.
I also like the three-dimensional body. Cute!


出典は、第21回折紙探偵団コンベンション折り図集Vol.21。
私が折ったのは、これが4つめの作品です。
(2020/03/24)

masanii-origami.hatenablog.com

(2020/03/08)

masanii-origami.hatenablog.com

(2020/03/01)

masanii-origami.hatenablog.com


The textbook is "The 21st ORIGAMI TANTEIDAN CONVENTION".
It's the 4th work I challenged.
(link above)


☘️☘️☘️


さて、解説にまいりましょう。
この作品は2ページ・34工程でスパッと終わるのですが、少々クセがあります。

Now, let me explain about this model.
It has only 34 steps and fits in just 2 pages, but processes are little tricky.


はじめは結構サクサクいけるのですが、工程25-28で白い部分(水しぶき)を一気に背中へ持っていくシーンが難しいです。

表・裏面を交互に見ながら少しずつ畳んで、ピタッと平面になる瞬間は、それだけで達成感があります。
何枚か写真を撮ったので、良かったら参考にしてみてください。
f:id:masanii_origami:20210417084011j:image

You can proceed smoothly in the early stages. However, it's difficult to bring the white part (it'll be a splash) to the back of whale in step 25-28.
When you fold it little by little while watching the front & back side and the model becomes flat, you'll feel a sense of accomplishment.
I took some photos, refer to them.


また、工程31で体を立体にするシーンは、意外と苦戦しました。
なかなか綺麗に畳めないので、ここはノリに頼ることに。
まず内側の一部にノリを入れ、開かないようにしてから、工程どおりに目を後ろに持っていきます。
それから、目はすぐに浮いてしまうので、ここもノリ付けで密着。
最後に、しぶきの根元も開きやすいので、蛇腹のスキマをくっつけて整形しました。

Step 31 to make the body three-dimensional was hard unexpectedly.
I relied on glue because it couldn't be folded neatly.
First, glue the inside and make it not to open the creases, then bring both eyes backwards according the procedure.
Next, glue both eyes to the surface as they may rise.
Finally, the trunk of splash also may open, so glue between wrinkles, and shape the whole.


これらの対策をすると、頭がパカッと割れた寄生獣になりません。

本来はどのように仕上げるのか気になるところですが…まぁ、これで良しとしましょう!

If you take these measures, his head will not crack.
I don't know how the designer addresses, now it's almost OK.


☘️☘️☘️


ユニークな作品との出会いは、とても楽しいです。

作家さんの豊かな発想には、頭が下がりますね。
折り紙の世界は、まだまだ知らない事ばかり。
私のコラムを通して、その面白さを知っていただけたら嬉しいです。

f:id:masanii_origami:20210417083956j:image

I introduced "Whale" designed by Ryan Dong.
Encountering unique works is very exciting.
I admire each designer's wonderful idea.
There're a lot of unknown world, I'm happy if you know the fun through my column.


「もっとマニアックな作品を折りたい!」と思った、そこの貴方。

ぜひ、「折紙探偵団コンベンション折り図集」のバックナンバーをチェックしてみてください。

PayPalなら、クレジットカードで買うことができます。
今回のテキストもPayPalで買いましたが、決済から配達まで驚くほどスムーズでした。オススメです!

www.origamihouse.jp

You may interested in deeper Origami world, check the back number of "、ORIGAMI TANTEIDAN CONVENTION".
(link above)

You can buy them with PayPal, I did that too. It was surprisingly smooth from payment to delivery, you should try once!


それでは、アトリエまさにぃで、またお会いしましょう。

See you again in Atelier masanii.


3ヶ月ぶりの折り紙講座をエンジョイ!/ORIGAMI class we've been waiting for!

アトリエまさにぃへ、ようこそ。

Welcome to Atelier masanii.

f:id:masanii_origami:20210403140522j:image


コロナの影響で閉鎖されていたサークルの活動場所がやっと解禁され、3ヶ月ぶりに定期講座を再開することがでしました。

フルメンバーではありませんでしたが、こうして交流の場がもてるのは喜ばしいことです。

My Origami class was closed because of COVID-19, but we reunited for the first time in 3 months!

Although there were fewer members than usual, I'm happy that we could interact again.


「こんなの作ったよ」「ココを聞きたかっんだけど…」などの折り紙トークもあれば、ロビーで雑談したきり1時間帰って来ない人も。
うん、それで良いんです。

Some told us "I brought a new one!" and some asked me "I have an unknown part".
And some chatted at the lobby and didn't come back for an hour.
That's fine!


というわけで今日は、メンバーの皆さんが折った作品たちを一挙公開!

Today I'll introduce new works folded by each classmate.


☘️☘️☘️


❶Tさんの「片手シンプルローズ」/"Simple rose by one hand

35cmタントを購入してから、すっかり佐藤ローズの虜になったTさん。
この日の課題は、サイドを折り上げて花びらを増やす作業です。

f:id:masanii_origami:20210403140553j:image

T-san (Here I call him so because of his anonymity) is addicted to Sato Rose since he bought 35cm Tant papers.
This day he adressed increasing the volume of petals by folding up the side.


前回も見事なバラを披露してくれましたが、だんだん私のアドバイスも少なく、より高度になってきた気がします。
もう少しで、マスターできそうです。
(前回:2020/12/27)

masanii-origami.hatenablog.com

Last time he showed us a beautiful Rose. (link above)
I felt that he can play with less advice & more advanced than before.
He'll fully master it in the near future.


❷タケルくんの「菊」/Chrysanthemum by Takeru

春から小学6年生のタケルくん。
この日は、美しい八角形の「菊」を折ってくれました。
出典は「実用折り紙 美しい草花」、著者は長谷川太市郎さんです。

Takeru is 6th grade of elementary school student from this spring.
He made "Chrysanthemum" with a statuesque octagon, designed by Taichiro Hasegawa.


さすが、内側の作り込みが緻密ですね!そのままブローチとして使えそうです。

f:id:masanii_origami:20210403140621j:image

It's his outstanding technique that the inner structure is made precisely.
It can be used as a brooch immediately.


彼は学校で図書委員になり、図書室に季節の作品を飾っているとのこと。
ぜひ一度、見に行きたいものです。

I heard that he became a library committee member in his school, and now he decorate the library with seasonal Origami works.
I want to see them once!


❸みはるちゃんの「バラ&2色クローバー」/Roee & Clover by Miharu

彼女は春から小学3年生になります。
川崎ローズを披露してくれたのは、昨年末のこと。
(2020/12/29)

masanii-origami.hatenablog.com

Miharu is 3th grade of elementary school student from this spring.
Last year she showed us nice "Kawasaki rose". (link above)


当時は手取り足取り、という感じでしたが、今回はテキスト「折り紙夢WORLD」を見ながら一人でやってもらうことにしました。

At that time I fully supported her, but this time I advised her to challenge playing with only textbook.


はじめは不安そうでしたが、ちょっと目を離したスキに仕込みが終了しており…
2〜3回アドバイスをした程度で、サクッと完成させてしまいました。お見事です。

f:id:masanii_origami:20210403140649j:image

First she seemed to be a little worried, but she finished preparing all creases soon.
Then she completed all steps easily with only a few support. Great!


下にあるのは、次に作ってくれたお気に入りの「クローバー」
色分けしたいパーツに印をつけて展開してから、そこにピンク色を貼り付けて作り直すという、素晴らしい工夫を見せてくれました。
バラをのっけて、テントウムシを描けば、春らしいお飾りの完成です!

f:id:masanii_origami:20210403140700j:imagef:id:masanii_origami:20210403140720j:image

Next she made "Clover", her favorite.
She showed us wonderful ingenuity.
She expanded all paper after marking the part which she wants to divide another color, then she rebuilt by stacking a pink paper.
Putting a Kawasaki rose on clover and drawing picture of a ladybug in it, cute ornament has completed!


❹はぁちゃんママ「うさぎ」/Rabbit by Ha-chan's mom

カミキィさんの作品にどっぷりの、はぁちゃんママ。
節分の際には、チャーミングな鬼トリオを作ってくれました。
(2021/02/04)

masanii-origami.hatenablog.com

Ha-chan's mom is addicted to the Kamikey's textbook.
We remember that she showed us 3 charming works in February. (link above)


この日のメニューは、「カミキィの<か和いい>季節のおりがみ」より「干支だるま うさぎ」
サークルの時間中に7個も作っていましたが、家でも大量に作っていたようで、その夜にはぁちゃん(娘さん)から写真が送られてきました。
ズラリと並んだうさぎちゃん。
カラフルな絵柄とポップな表情が素敵ですね。

f:id:masanii_origami:20210403140836j:imagef:id:masanii_origami:20210403140818j:image

This time she made Rabbits, one of the Japanese zodiac.
7 rabbits was born during class time. And more, I found out that she was making more at home. Her daughter sent me some photos and told me so.
NICE photo that rabbits lined up in a row.
Colorful paper & lovely face illustration are also good!


❺はぁちゃんの「花折りピラミッド」/Flower pyramid by Ha-chan

最後にご紹介するのは、あじさい折りの名手、はぁちゃんです。

Finally I introduce Ha-chan's work, the expert of "Hydrangea folding".


丁寧・着実な仕込みは相変わらず。
サークルでの時間が良い気分転換になっているとのことで、じっくり作品に向き合っていました。

Her preparation of creases are polite & steady as ever.
She said that my class is a space for relaxation, and she enjoyed playing calmly.


時間内に終わらなかったので、未完成のまま持ち帰ったのですが、その日の夜に完成写真を送ってくれました。
花柄の模様が、しっかり中心の正方形に収まっていますね!
細部の作り込みもさすがのクオリティで、絵柄と折り目の組み合わせが幻想的です。
完成して初めて絵柄のパターンが分かるのも、あじさい折りの面白いところですよね。

f:id:masanii_origami:20210403140856j:image

She couldn't finish and took it home. but she sent me a completed photo at night of the day.
Flower pattern fits in the center square exactly.
Each detail is notable quality, and the combination of color patterns & creases are fantastical.
"Hydrangea folding" is interesting that the final design will not known until the final step.


☘️☘️☘️


「サークルがないと、何かが足りないのよね」

"We feel something empty without this class."


皆さんが再会を喜ぶ中で、ふとこんな言葉が聞こえました。

While rejoicing to reunion, one of my classmate said so.


定期講座を開いてから3年くらい。
このサークルが皆さんにとっての「いつもの居場所」になっていたんですね。
たぶん、私にとってもそうなんだと思います。

こうした空間を作ることができて嬉しいです。

It has been about 3 years since I opened my Origami class.
I found out that my class has been home for everyone, maybe for me too.
I'm happy to create such a place.


おしゃべりしながらでも、黙々と折っても、昼寝してても、誰も怒らない、気にしない。

(さすがに寝ている人はいませんが…今後どうなるんでしょうね。)
極力ルールを作らない自由な時間を意識して、これからものんびりやっていこうと思います。

I won't scold if they're chatting, play silently, and even napping.
(No one is napping for now, but I don't know in the future.)
I'll be conscious of NOT setting any rules and going freely from now on.


アトリエまさにぃで、またお会いしましょう。

See you again in Atelier masanii.


おなかの構造に注目!羽毛付フクロウ/Owl with feather

f:id:masanii_origami:20210324232823j:image

今日ご紹介するのは、津田良夫さんの「羽毛付フクロウ」です。

Today I introduce "Owl with feather" Designed by Yoshio Tsuda.


出典は「第21回折紙探偵団コンベンション折り図集Vol.21」。

前回・前々回に続き、これが3つめの作品です。
このテキスト、面白い題材が揃ってますねぇ。
(2021/03/08)

masanii-origami.hatenablog.com

(2021/03/01)

masanii-origami.hatenablog.com

The textbook is "The 21st ORIGAMI TANTEIDAN CONVENTION".
This is the third work following the previous two.
This textbook has a lot of nice & interesting models.

www.origamihouse.jp


☘️☘️☘️


規則的に折り出されたおなかの羽毛と、それと対照的にシンプルな体。

こうした表現ができるのは、折り紙だからこそ。素晴らしいデザインです!

Tummy feathers are alined precisely, in contrast, the whole body is designed to be simple.
Such expression is unique to ORIGAMI. Wonderful!


このウロコのような構造、以前から作ってみたかったんですよね。
羽毛以外は複雑でないので、練習にはもってこいの題材です。

f:id:masanii_origami:20210324232916j:image

I've wanted to challenge this kind of structure.
This model is not complicated except for feathers, so it's suitable for practice.


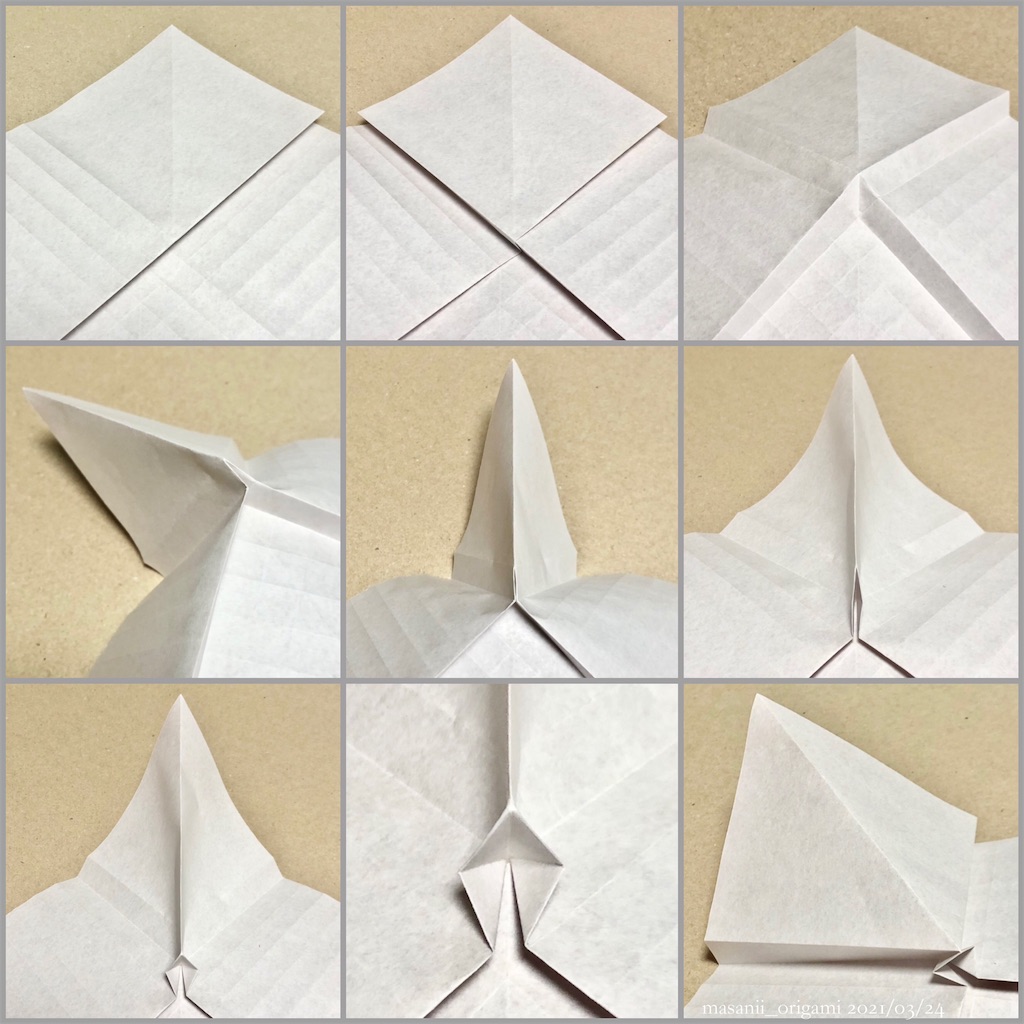
折っていく過程を記録したので、皆さんも参考にしてみてください。
折るだけでこんな模様ができるなんて、不思議ですねぇ。

f:id:masanii_origami:20210324232924j:image

I left some photo records, you'd better refer to them.
It's amazing that we can make such patterns just by folding.


☘️☘️☘️


一発で成功すれば良かったのですが、最初は失敗しました。

I wanted to succeed in my first attempt, but I couldn't.


工程52、羽毛を折り終わった直後のこと。
全体の寸法がオカシイと思ったら、段折りの位置と向きを間違えていました。
完全に手遅れですが…
勿体ないので、強行突破することに。

f:id:masanii_origami:20210324232937j:image

When I finished making tummy feathers (Step 52), I realized that something is wrong with the whole balance. I made a mistake in the position of pleats!
It's too late, but I decided to continue as it is.


で、完成したのがコチラ。
ぬーん。

f:id:masanii_origami:20210324232945j:image

This is the finished product.


なんか長いんですけど…
アマビエの出来損ないみたいな、古代遺跡の祭壇に並んでるオブジェみたいな代物になってしまいました。

Somehow long...
It seems to be an unsuccessful Amabie (A phantom who purifies the plague) or an object in ancient ruins.


☘️☘️☘️


ということで、謎の威厳を放つオブジェの犠牲のもとに完成したフクロウちゃん。
夜行性の鳥らしく、写真は黒い背景でシックにまとめました。
お手本と比べると、頭のサイドが膨らみ過ぎてる気がするけど…まぁ、いっか!

f:id:masanii_origami:20210324232957j:image

Anyway, I completed an Owl at the expense of an object who gives off a mysterious dignity.
Like a nocturnal bird, I shot it on black background, to make it cool.

Compared to the textbook, both sides of the head may be swollen... Well, it's OK!


フクロウはけっこう人気が高い題材で、様々なバリエーションが考案されています。
どれも、ユニークな作品ばかり。
挑戦した際には、また紹介させていただきますね。

Owls are popular as an Origami subject, various models are created.
All of them are unique & attractive, I'll introduce them if I try someday:)


今回の素材/Today's material